Software Installation: Conda
Conda Installation
Conda is a package manager which is amazingly powerful and simple to use. If conda is not already on your compute infrastructure, and if you have permission to install software, then the easiest way to get conda is to install Anaconda. You can find a variety of Anaconda installation instructions for different computational platforms here
If you do not have permission to install Anaconda (or other Conda provider) then work with your systems administrator to get conda available.
Quick How-To
There is an entire collection of biology-related software that has been deposited into a “channel” of conda called bioconda. Check out all the available software packages you can install at the bioconda package repository — more than 7,000 and growing.
As a quick example for how to install software using Conda. Search in the bioconda repository for a program called fastqc. The website shows us exactly how to install the program:
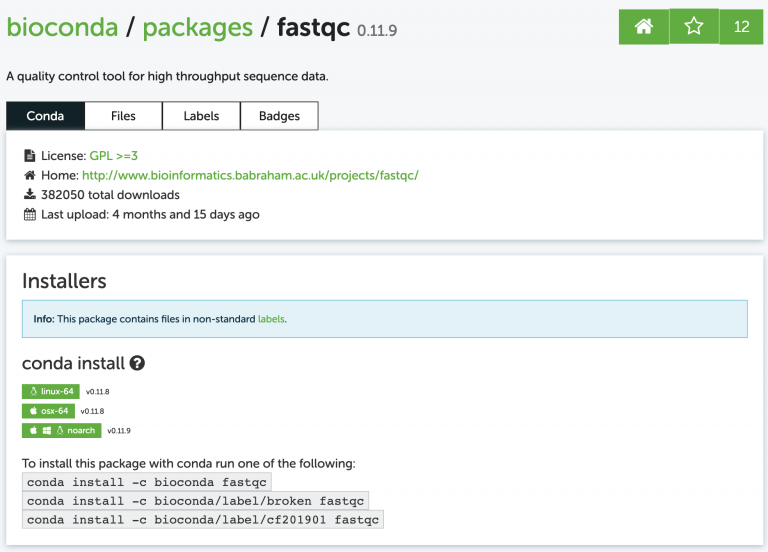
To install it run the conda install command as shown on the site:
conda install -c bioconda fastqc
You’ll probably get a message asking if you want to install some other dependencies (other programs that fastqc relies on). It will look like this:
Proceed ([y]/n)?
Note
Often when you see messages like this in UNIX-based operating system, the brackets around [y] mean that if you just press enter, it will assume you mean “yes”. In other words, [y] is the default assumed response.
Did it work? Run fastqc with the -h (help) flag and see:
fastqc -h
Base Software Installation
This course uses a variety of software packages listed on the Software Requirements page.
Rather than install them all we will use an environment file to install them with conda.
To do this, create a new file named base.enrivonment.yml. And add the following
contents:
channels:
  - conda-forge
  - bioconda
  - defaults
dependencies:
  - conda-forge::r-base=4.1.3
  - bioconda::fastqc=0.11.9
  - bioconda::multiqc=1.13a
  - bioconda::sra-tools=2.11.0
  - bioconda::fastp=0.23.2
  - bioconda::samtools=1.15.1
  - bioconda::bwa=0.7.17
  - bioconda::jellyfish=2.2.10
  - bioconda::hifiasm=0.16.1
  - bioconda::mummer=3.23
  - bioconda::bedtools=2.30.0
  - bioconda::repeatmasker=4.1.2.p1
The contents above are in YAML format and are instructions that can be used by conda to perform bulk installation of software. The following explains the meaning of the elements of the file:
name:tells conda what the name of the environment is. You will use this name to access the software after installation.channels:tells conda what online repositories to use to find softwaredependencies:lists the software that should be installed. The list includes the name of the channel (e.g. bioconda), the software name, and a specific version to install.
You can install all of these software into the “base” environment with this command:
conda env update --quiet -n base -f /base.environment.yml
Additional Software Installation
Some of the software tools are not part of the “base” environment because they work best in their own self-contained environment. You can install the remaining software in this way:
Braker2
Step 1: Create the following YAML file named braker.environment.yml
name: braker
channels:
  - conda-forge
  - bioconda
  - defaults
dependencies:
  - anaconda::perl
  - bioconda::perl-app-cpanminus
  - bioconda::perl-hash-merge
  - bioconda::perl-parallel-forkmanager
  - bioconda::perl-scalar-util-numeric
  - bioconda::perl-yaml
  - bioconda::perl-class-data-inheritable
  - bioconda::perl-exception-class
  - bioconda::perl-test-pod
  - anaconda::biopython
  - bioconda::perl-file-which
  - bioconda::perl-mce
  - bioconda::perl-threaded
  - bioconda::perl-list-util
  - bioconda::perl-math-utils
  - bioconda::cdbtools
  - bioconda::braker2=2.1.6
Step 2: Create the new braker environment
conda env create --quiet -f braker.environment.yml
Step 3: When you want to run braker run the following to enable the environment and then run any of the braker programs:
conda activate braker
braker.pl
You can use any of the software in the base environment by switching back:
conda activate base
EDTA
Step 1: Create the following YAML file named edta.environment.yml
name: edta
channels:
  - conda-forge
  - bioconda
  - defaults
dependencies:
  - bioconda::edta=2.0.1
Step 2: Create the new braker environment
conda env create --quiet -f edta.environment.yml
Step 3: When you want to run EDTA run the following to enable the environment and then run any of the EDTA programs:
conda activate edta
EDTA.pl
You can use any of the software in the base environment by switching back:
conda activate base
BUSCO
Step 1: Create the following YAML file named busco.environment.yml
name: busco
channels:
  - conda-forge
  - bioconda
  - defaults
dependencies:
  - bioconda::busco=4.1.2
Step 2: Create the new BUSCO environment
conda env create --quiet -f busco.environment.yml
Step 3: When you want to run BUSCo run the following to enable the environment and then run any of the BUSCO programs:
conda activate busco
busco
You can use any of the software in the base environment by switching back:
conda activate base